Wednesday, November 13, 2013

Pinterest project: Herringbone wall art DIY

After completing the Chevron wall, I felt very accomplished.  I wanted to do more.  Searching for ideas and tips from other bloggers, I stumbled upon this artwork from Moonpie Dreams.  I thought, "I can do that."  (Remember I had just done a WHOLE wall)

 
Moonpie Dreams


 As you can see when you click the link, she has done a pretty good job of explaining the process and even has a link to the pattern she used to guide her.  I felt even more confident.
With that confidence I printed up a 40% off coupon for Michael's we headed to the store.   There was an entire wall of Canvases.  I went with the cheapest, because I wanted a big one.  Since I'm not an artist, the different quality of art materials won't be an issue.  The 30x40 was $32.99, perfect with the coupon.  We had some kid paint and some intermediate acrylic paints at home those coupled with the left over wall paints  and I was stocked.
So it begins....
Following the Moonpie Dreams blog again, I start with a zig zag line down the center of the canvas.
(Apologies for not being able to get a better image, it's quite challenging to capture a thin gray line on a white background.)
With a very large ruler or yard stick extend the lines you want to the edge of the canvas.


Then paint away.


There was no rhyme or reason to the colors in my case, but go with what ya feel.  Some of the colors I mixed together to get more variety (I didn't have that much inventory in leftover paint so I had to improvise).


I liked how the inspiration piece had texture in each color.  There was some glaze in my paint stash, so I thought I would brush it on.  My lines weren't perfect and this could be a great solution to hide my blemishes.
 Turns out, the Miller Lite and late hour may have boosted my art ego.  After the paint dried in the morning and the art was on the wall, I didn't like it.  The hubs came home from work and confirmed that the glaze was a bad decision. 


That night and during baby's nap time the next day I reverted back to the original idea.


Ta-Da!


This project was much harder that doing the Chevron wall.  But in the end it adds some nice bright colors to the room, so I'm glad I was up for the challenge.

Ya never know until you try, right?!

Thursday, November 7, 2013

Hydrogen Peroxide and Baking Soda to clean kitchen floor tile grout: Holy Cow, Results!!

So, you know how everyone is always pinning those nifty cleaning tips all over the internet?....Vinegar for everything, homemade cleaning products from ingredients under your sink, etc.   Like most, I have been a skeptic.  While a couple things have worked for me, most seem too easy to be true (or at least they are portrayed that way).  Let's admit it, when you pin it your house is somehow "feels" cleaner but, how many people actually attempt all these tips and solutions? 
I decided to put one to the test.
I noticed while I was mopping yesterday that the grout in the kitchen was noticeably darker than the bathrooms.  Since they are all the same, I knew it was in need of a hard core cleaning.  Obviously, the kitchen is a much higher traffic area than the bathrooms and it's in the middle of the house so you have to walk through it to get anywhere.  I mop with a bleach solution because I have a six year old, a toddler, a husband and a dog.  I guess the bleach just wasn't cutting it to remove the grossness that gets trapped in the grout lines.  After reading several blogs and watching some you tube videos, I decided to try the hydrogen peroxide and baking soda.  This decision was mostly based on the fact that I had those two things on hand and I didn't want to burn my lungs out with straight bleach.
First, I poured a little peroxide on the grout.  I used an old toothbrush to spread it down the line.  Next, I sprinkled some baking soda and rubbed it in.  It immediately looked lighter.   I continued to do small sections because the baby was napping and I didn't want to have to hurry and clean a huge mess if he woke up.  Then I ran out of peroxide...
Oh well, the baby was gonna wake up soon, so I  sponged up the left over residue.  For this I just used water and a basic kitchen sponge. Then I put a towel down to quickly dry the extra moisture, because the baby was really awake now.
I was pretty satisfied with the results.  Then the floor dried all the way-----
Un-flipping-believable!
What a huge difference!!

 You can already see the dirty mixture just after a quick scrub... In the picture below the bottom left corner area has been cleaned and wiped.


You can see where I stopped.  The top grout lines in two pictures above is the "before" and the bottom is the "after."   And it didn't take too long.  These are 18x18 inch tiles and I probably did like a ten by five foot area in 45 minutes.
I will be finishing the job tomorrow during nap time when I have more peroxide. 
If any of you find a method that is faster or easier let me know because this floor will definitely not stay like this forever.....

Until then, (if you have the choice) I would advise to pick a grout color that is not too dark and not too light.  This way you will have one less area to detail.

Monday, October 21, 2013

Chevron painted wall DIY

The Chevron trend is everywhere, so why not in my house, too?!
An accent wall seemed the best choice and I am very pleased with the results.   There is a wall about the same size directly across that is probably going to match as soon as I get  more painter's tape.
The process was pretty easy once you get the measurements figured out.  The best way for me was to make a rectangular grid and connect the angles.


 This way you can visualize how big your stripes will be and adjust accordingly.  After my hubs took a look, we opted to "double" the width of the stripes.  They went from 4 inches to 8 inches.   The most tedious was leveling and drawing all the pencil lines, but it was a necessary step to be sure the painter's tape would be straight.
Thankfully, I had more of the original wall paint on hand so I could touch up all my pencil marks and eraser smudges after the project was done.
One stencil video by Cutting Edge Stencils had some helpful tips on applying the paint.   Normally, I would have just brushed the paint on, but after watching the video I went with the small foam roller.  I did not have a paper plate on hand, so I used a Chinese take out container.  This technique was super easy on the application and clean up. 


 I decided to do gray on gray, because that's what we had.  The walls are light matte gray and I had some leftover darker eggshell gray from a desk I painted several months ago.  It worked out perfectly, if left to choose from the paint store I probably would have gotten a bold color...which I would have wanted to change sooner rather than later...
Pinterest also has tons of really cool canvas chevron and herringbone project ideas.  I'm definitely not an artist, but a large piece of bold wall art may not be out of the question after all.

UPDATE: 5 days later, I did the wall across to balance out the accent.  Well, that's what I said to the hubs...I just really like the way it turned out.
If you're gonna give it a shot, I'll happily answer any question. :)

Wednesday, October 9, 2013

DIY: Coffee table to Ottoman

There are tons and tons of tutorials, pictures and blogs turning coffee tables to ottomans.  My "light bulb idea" sparked from browsing Pinterest while looking for things to do with a pallet.  I didn't actually have a pallet, but my hubs had recently informed me that he could get one from his job.  Obviously, I wanted to find something to do with it.  I stumbled upon a picture of a beautiful room with a beautiful ottoman.  The caption stated "Get a pallet, foam, table legs, fabric and a staple gun." 
Get a pallet, foam, table legs, fabric and a staple gun. What the hello??? LOVE


I know, awesome, right?  This image came from my friend Megan's Pinterest page, so I guess I can blame her for all this.    Come to find out, THIS particular ottoman is from West Elm.  AND it's 400 bucks.  It seems like a pallet would do the job and in my mind it seems easy.  Just like the caption said.
I'm not sure if any of y'all have brought home a pallet, but they are huge.   I mean, I've seen them before laying out behind the grocery, but up close and personal they are suddenly a lot bigger....and heavy.  Really heavy. 
I had sort of given up on the idea.  It would involve contracting out my hubs, I would need his cutting skills AND strength.  I know because he brought one home and I could barely move it around the garage by myself.  He ended up disassembling it and we used the wood for another project.
Then....one day while surfing the pin boards again I see another beautiful ottoman and someone had made it from a coffee table!

IMG_3861
http://www.fivedaysfiveways.com/2011/07/diy-tufted-ottoman.html


If you guessed that I would want to pursue this project, you would be correct.
Aaand, it just so happens that my sister-in-law had an unwanted coffee table from her sister-in-law....
it was meant to be!


The five days five ways blog gives a pretty good detailed tutorial, too.  That coupled with some other blogs (diy show off , classy clutter ) and I feel like I'm ready to tackle this.
Here's what the coffee table started out looking like.

It's totally 80's.  Actually I think it is stamped '91 on the bottom, but you get the idea.  Out of date, but not out of date enough to be a cool vintage piece.   Perfect for an ottoman, it measures 36x36 inches, just like the one from West Elm.
First it needs to be painted.  I have just recently made a pretty bold statement in our living room with some teal end tables, so I think I will stay neutral with this one.  Plus, I'm on a serious budget, so I have to work with what supplies I have.
I would really like a trendy chevron or bold graphic print but, again,.....budget.   I had printed up a 50% off coupon for JoAnn fabric, but I decided to walk through the fabric section of Walmart just to see what they had to offer.  They did have a pretty cool burlap with a black chevron print.  It wasn't too pricey, but I would probably need to double it up or put fabric underneath because the burlap was kinda "holy".  Either way that would double the expense.  I was about to leave when I glanced at the clearance rack and spotted a fairly neutral bolt.  I was a bit undecided then I saw the price was $3/yard!!  Score.  6 bucks for 2 yards, I wasn't going to find a deal like that anywhere else.  And it was upholstery fabric. Bonus.
The glass insert gets removed (obviously) and is replaced with a spare piece of wood.
After a bit of measuring and eyeballing the room, I decided the ottoman needs to be six inches shorter.  My handy hubs cut it down for me.  He even sanded the leg bases for me before he reassembled it.  


I painted around the whole bottom, but after taking out a few screws to see how much of the table came apart, I realized that just the legs came off easily and in a perfect place.  I was worried about how I was going to transition from fabric to wood.  This was going to work out perfectly.  I love the look of the nail head strips, but that would be an added expense.
I  had to buy extra long needles and the supplies to make my own buttons for the tufting.  The needles I found on Amazon, the package contains 4 needles measuring 6, 8 10 and 12 inches.  The buttons I found on Ebay, but she has a shop on Etsy  called Cover Button City.   If I ever need buttons again, I will get them here.  It was a good price and she emailed me a tutorial right away, I like good internet communication.  My buttons are size 36 or 7/8".  If you have never ordered any before, be sure to get the WIRED backs.  I almost ended up with FLAT backs because I was looking at price over description.  
(The button making could be a blog post in itself and there are many on the subject.  The best advice I read was to use glue.  Upholstery fabric is thick and these buttons are made for thin fabric.  I didn't not have Hard as Nails like the other blogger specified, but I did have Locktite which is basically the same thing.  So, I just put a little dab in each button before I very forcefully jammed in the back.  If you try this and have questions, just ask.  It was hard and tedious, but it got done.  The backs don't look pretty, but no one will know.  Well, except you.)
The foam is were I splurged.  It was $31.99 plus shipping.  Lots of bloggers seem to have found deals at Hobby Lobby, but we don't have one of those anywhere close.  Foam Factory online is what I went with.  They have every option you can think of and if you want to pay for it they will even custom cut it for you.   You can find two inch memory foam twin mattress pads for $30-35 on Ebay.  That was my first choice, but after I thought about what kind of use the ottoman was going to get, ,memory foam was too squishy.   I went with the Lux-R, opting for the 2 inch instead of the 4 with the plan to double it up.  I cut off the corners because that was the shape of my wood and since I didn't have a fancy "foam cutting bit" for the drill, I used a drywall knife.  I just worked it around until I felt like enough foam was out of each hole.
I did use craft spray adhesive to keep the two pieces of foam together and after I had the middle button in, I also sprayed some adhesive between the foam and the wood.  I didn't want it to slide around when I tilted it on the side to pull the needle through.
After a lot of pulling and strategic stapling of the thread to the underside, I had it looking almost how I wanted.
The boys were going to be jumping, rolling, sitting and who knows what else on the ottoman, so I decided that the fabric was going to have to be tight.  I like the loose, lots of tuft look, but I wasn't sure how practical it would be in my house. 
I pulled it a bit tighter and added a few more staples.


He hopped up as soon as he woke up from his nap.  So while my upholstering job may not be perfect, you can see that it's going to work out just fine.  And it is so much nicer to put your feet up on some cushion instead of a hard coffee table.

Saturday, September 28, 2013

DIY: End tables from old to new

          We have been living in our new house for over a year now.  There were a few pieces of furniture that we borrowed from my parents and it was time to give them back.  (They got another house) So it was time to hit the thrift stores and/or internet.  I had been perusing Craigslist for an octagon end table.  I have really been wanting one.  I like the shape and storage, plus I knew one of those seventies styles from your grandparents house and/or college apartment would look really cool with a fresh coat of bright paint.
         My mom was at the Habitat for Humanity and texted me a picture of a round table similar to the octagon style.  I headed up there to see it for myself.  It was the perfect height and size.  The price tag was $25 and they were having a 40% off sale on furniture that day.  No brainer....

I had already sanded the top when I realized I hadn't taken a picture....oops.

I've painted quite a few pieces of furniture and my mom has painted a ton.  What I've learned, is that unless you are going to apply a polyurethane, the top is going to chip, get scrapped or rub off.  If it is something that is going to get a lot of wear and tear staying with the wood is best.  Plus, my hubs sometimes can't cope with painting over beautiful wood.  In this case I didn't think the wood was beautiful, but the end table gets constant use.  Living with all boys, I can't have a piece of furniture that I have to say,  "don't bang the bat/club/stick/book/cup/car/superhero/rolling pin..... on there."   It has to be able to handle everything.  Luckily, when I sanded the top I really liked the wood grain.  (Maple, I think)
Since I was going to paint the bottom, it is much easier to apply a liquid deglosser than sand.  After that was prepped, I put a coat of primer.


The previous owners of the house before this one had left an end table.  We had it shoved in a closet and basically used it for shelving.  But, since I was already prepping and painting I decided to go ahead and do that table too.

Both pieces are nice and while some may get upset that I am painting and not staining, we are not very traditional.  We like a little color and unique pieces.
This is how they turned out.


It's called Caribbean Holiday by Olympic.   While gray would have been the more "modern" choice, our walls are gray and the carpet is beige.  We wanted something that would stand out, not blend in.   Wwe have turquoise as our accent color around the house, I thought something in the teal family would be cool.  I really love them!  The poly on the top of this one is a gloss, because it get some hard core wear and tear.  The handles are the original, spray painted, of course.   I left the rim of the dark wood, because I thought it was interesting and because the other table had a darker wood.

Not too shabby, eh?

I have two other projects in the works...
One is converting an old coffee table into an ottoman.  (had to enlist the hubs to help with that because it involves a big power tool)
The other is another end table for the baby's room.
The ottoman is coming along.  We have painted the legs and shortened it six inches.....
The end table hasn't been touched yet....can't decide what to do...
It's called a campaign table and has quite a notable brand.  I would like to keep it the way it is, unfortunately it has seen far too much wear to save.  There is a piece of the veneer that needs to be glued back on the side and a ton of scratches on the top.  But for 9 bucks, I couldn't leave it there.  :)
Hopefully I will have the updates soon, but for now we are headed to a birthday party.  Our fourth weekend in a row for birthday parties.  September was a big birthing month for the 1st grade parents.  :)

Tuesday, August 6, 2013

Adventures of on-line thrifting

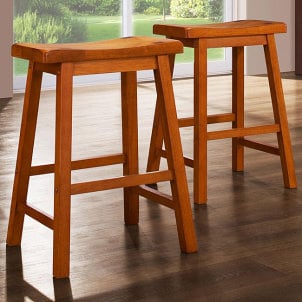
We moved over a year ago and our new house has a bar counter that transitions from the kitchen to the family room.  We had two bar stools that made the move with us and two from my mom.  The space looks and functions best with three.  So I always had one mismatched stool and one auxiliary.  Which is fine, but I feel like if you are gonna mismatch it should be all or nothing.   I always keep my eye out for an inexpensive swap, but haven't found anything that really talks to me.  The stools I have can be found pretty much anywhere on line and I was just about to cave and get two more.
Here they are on overstock.com


Two classic wodden bar stools waiting for patrons
Mine are from Ross and I got them for just under $30.
My parents just bought a house around the corner from us so my mom has been scouring Craigslist for random furniture items.
(Quick back story: The house was a foreclosure so I'm going to document the transition and changes.  Probably could be a blog in itself, but I'll do my best to post the updates and changes.  There will be lots of paint in our future.  And she's wants to go all modern on a budget.  Should be quite the adventure.)
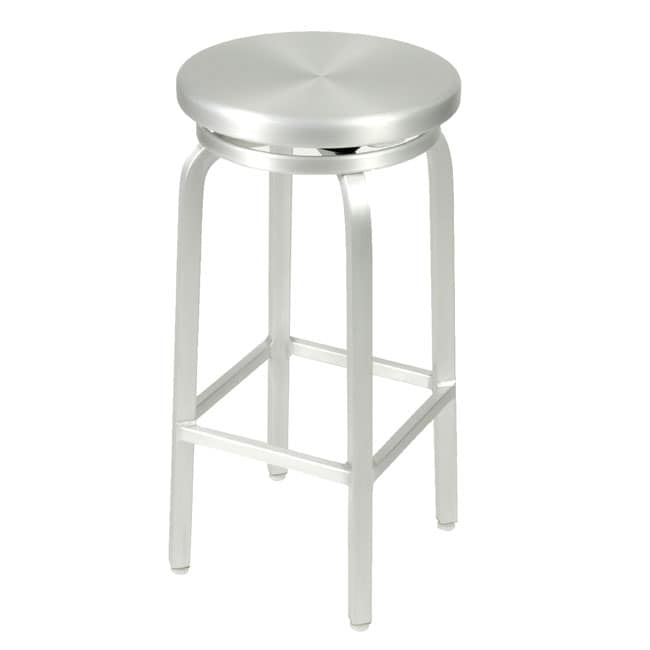
She's always showing me her finds and asking my opinion.  As you can imagine, I've seen tons of styles, new and old during her hunt.  Then she shows me three chrome gems!
Catch is they are an hour and a half away.
But.....
They are also at the beach....
The lady is asking $80 for all three.  Great deal, especially with the prices we've seen at full retail.
It is far, so I need to be 100% sure I want to commit before we make the drive out there.  First, I get the thumbs up from the hubs.  He likes them so that's one box ticked.
And after a couple phone calls about stability, price and location.  It's on.
Mom and I decided to take the kids and make a day of it.
It's Florida in the summer, so thunderstorms are always in the forecast.   A motto I've had since college is that it never rains at the beach.  I'm hoping that motto still holds true,but ya never know.  So, I throw a tarp in the truck with the bungees, load up the kids and off we go.
Indian Rocks Beach is still quaint and cute.  Driving on a beach road really makes you want to live on the beach.  In fact, the bar stool lady said she and her husband decided to sell the big house and get the condo on the beach.  Great trade off in my mind, it was a cute two bedroom RIGHT on the water.  Awesome.  Awesome for me too, because her chrome stools didn't match the new look she was going for. :) win. win.
I hate wheeling and dealing, but I did get the stools for $70.  I feel happy, so now off to the beach.
We find public access and parking, put the stools in the truck cab and schlep everything to the beach.
It was great.  Swimming, sun and sand castles.


 While phone pictures aren't my favorite they are the most convenient, I was very happy to get good shots with both kids (mostly smiling) with my mom and myself.  And...no rain at the beach!  More winning.
A few hours later we wrap it up and schlep the sandy kids back to the truck.
I get the stools secured and covered in the back and we head home.
We traveled through three different counties and hit three different storms.  The heaviest down pour was closest to home.  Thank goodness I had the tarp.

The stools were covered with three different colors, deep purple, mint green and mustard goldish yellow on a velour like cloth.  While it was a nice ode to my home town of Nola and the Hubs thought it was awesome, they were getting recovered.
We have a lot of turquoise accents, so I wanted to stay in that general genre.
I found a few micro fiber fabrics on-line but I headed to the fabric store.  I always had a fall back if I didn't find anything that fit.
I sent some pics to the Hubs to Yay or Nay.


The response was Nay, yay, yay.  So I'm down to two.  Ryder's favorite is obvious.  It's by HGTV home, so it's hip and bold.  In the long run I was afraid I would get sick of the pattern and it was feeling a bit too nautical to me.
So what we ended up with was this...
I think they are feathers, the Hubs thinks leaves either way nature theme.  


It's textured and durable, so it will hold up to the kids.  As you can see it changes in different light and angles, so it won't get old.  I actually love it more now then when I first covered it.  Oh, and it was on clearance at $9/yard which was all I needed.
I've also found that the baby can't (or hasn't figured out how to) climb up them.  While they do get a lot of spin and Ryder loves to use the hydraulic up and down, they don't get moved around like the old wood ones because of their weight and wide base.  Perfect.
In fact, after my mom saw how they get used in the space she has narrowed down her search.
Contemporary Bar Stool K-117
(From overstock, The southern mission and defysupply)
They all spin. :)